This app embeds a set of audio files in 2d using using the t-SNE dimensionality reduction technique, placing similar-sounding audio clips near each other, and plays them back as you hover the mouse over individual clips.
There are two options for choosing the clips to be analyzed. One option is to choose a folder of (preferably short) audio files. The second option is to choose a single long audio file which will be automatically segmented into discrete audio events using an onset detection algorithm, and then the resulting segments will be cut into and saved as individual audio files, and analyzed as before.
Installation
For the analysis portion, you need the following python libraries installed: scikit-learn, librosa, numpy, and simplejson.
The openFrameworks application only requires one addon: ofxJSON.
Run the analysis
The analysis uses librosa and proceeds in the following way for each audio clip: it extracts the first 13 MFCCs as well as their first and second-order deltas for each 512-sample frame in the clip, and then takes the mean of each of these across the frames to derive a 39-element feature vector which characterizes the clip. Regardless of the length of the clip, only the first second is analyzed. To do similarity analysis on longer lengths of audio, more sophisticated methods are needed.
After all of the clips are analyzed, t-SNE is used to reduce the dimensionality of your N x 39 features matrix to N x 2 (where N is the number of clips). This allows us to use the resulting 2d coordinates as our embedding assignments for the clips.
There are two ways to run the analysis. One is to go through the Python guide and save the generated JSON at the end of the notebook. Alternatively, a convenient command-line tool tSNE-audio.py is included in the scripts folder of ml4a-ofx. The first option is recommended to get a better understanding of how the analysis works, in which case you may shift there and come back with the JSON file and resume to the next section.
If you are using the convenience script, the following instructions will handle the audio feature extraction and t-SNE assignment.
You can analyze an entire directory of individual files, or on a single sound which gets segmented and cut into multiple individual files. To run it on a directory of sounds, run the following command:
python tSNE-audio.py --input_dir path/to/input/directory --output_file path/to/output/json
This will analyze all the sounds in path/to/input/directory and assign a set of t-SNE coordinates to them saved in the file path/to/output/json.
for example:
python tSNE-audio.py --input_dir ../audio/DrumSamples --output_file ../apps/AudioTSNEViewer/bin/data/points.json
To run it on a single audio file, in which case it will segment the audio by onsets, analyze each chunk and save them to a new directory, then run:
python tSNE-audio.py --input_file path/to/your/input/file --output_audio_dir path/to/output/chunks --output_file path/to/output/json
for example:
python tSNE-audio.py --input_file /Users/JaneDoe/Downloads/MyAudio.mp3 --output_audio_dir /Users/JaneDoe/Desktop/myClips --output_file ../apps/AudioTSNEViewer/bin/data/points.json
With the second option, the input audio file will be split into many discrete audio chunks and saved into the directory specified by --output_audio_dir.
You may optionally set the perplexity of the t-SNE using the --perplexity argument (defaults to 30), or the learning rate using --learning_rate (default 150). If you’d like to learn more about what perplexity and learning rate do in t-SNE, read how to use t-SNE effectively.
Note, you can also optionally change the number of dimensions for the t-SNE with the parameter --num_dimensions (defaults to 2) but this ofApp is currently setup to just read 2 columns at the moment.
After the analysis, you should have generated a JSON file containing the file paths to the individual audio clips and their t-SNE embedding assignment. Make sure you do not move the audio clips to another location after doing the analysis, because the paths are hardcoded into the JSON file.
Run the viewer application
If you are building the application from source, just make sure the variable path is set to point to the JSON file. If you are running the pre-compiled application, you need to rename the JSON file to points.json and place it in the app’s data folder, which is the default file path it is opening.
You should get something that looks like this.
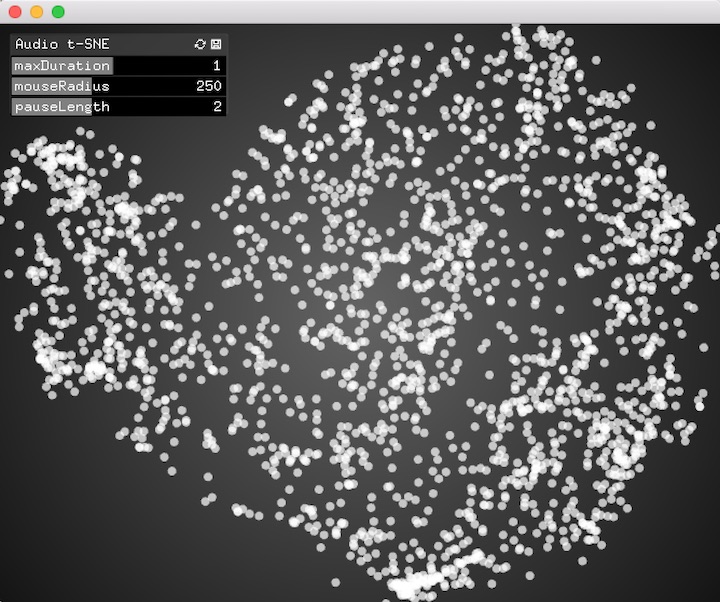
To interact with the application, move your mouse around over the circles to hear the individual clips. Several variables in the GUI control a few parameters:
maxDuration: this is the number of seconds (default: 1.0) to play any individual clip before stopping it.
mouseRadius: radius in pixels between mouse and clip to trigger (default: 250). If the mouse is less than this many pixels from the clip, it will trigger.
pauseLength: minimal number of seconds between consecutive triggers of the same clip (default: 2.0). This is to ensure that you don’t keep re-triggering the same clip at framerate while your mouse is moving over it.